Enable or Disable Comments for the Entire Site
Here are the steps to enable or disable comments and related features in WordPress:
1. Log in to your WordPress dashboard.
2. Hover over “Settings” in the left menu and click on “Discussion.”

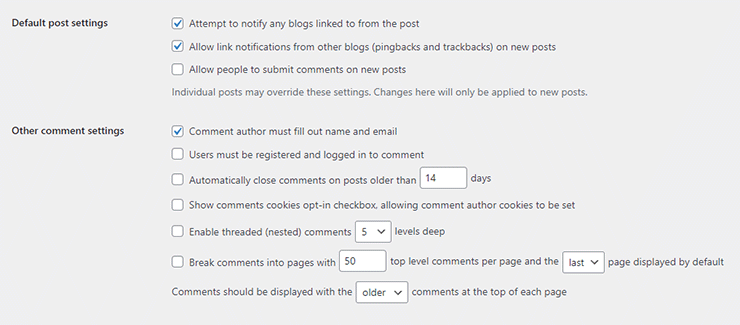
3. Under “Default post settings,” check the box next to “Allow people to submit comments on new posts” to enable comments. Uncheck the box to disable comments across the site. NOTE: This setting only applies to future comments, not those already made or stored in the moderation queue or held by the spam filter (such as Akismet).
4. Review the other various comment-related checkbox settings on the page:
Other comment settings
- Other comment settings Comment author must fill out name and email
- Users must be registered and logged in to comment
- Automatically close comments on posts older than [X] days
- Show comments cookies opt-in checkbox, allowing comment author cookies to be set
- Enable threaded (nested) comments [X] levels deep
- Break comments into pages with [X] top level comments per page and the [last/first] page displayed by default
- Comments should be displayed with the [older/newer] comments at the top of each page
Email me whenever
- Email me whenever Anyone posts a comment
- A comment is held for moderation
5. Click “Save Changes” at the bottom for your settings to take effect.
Keep in mind that these settings will affect all new articles/posts on your site. For existing posts, you may need to manually disable comments for individual posts/pages, or remove past comments manually or using a plugin.
How to Enable or Disable Comments on an Individual Page in WordPress
To enable or disable comments on an individual page in WordPress independently of the global comment settings, you should follow these steps:
1. Log in to your WordPress admin dashboard.
2. Go to the “Pages” section and find the page for which you want to enable or disable comments.
3. Edit the page by clicking on the “Edit” link below the page title.
4. In the page editor, locate the “Discussion” or “Comments” box. If you don’t see it, click on the “Screen Options” tab at the top right corner of the screen and make sure the “Discussion” option is checked. This will cause the Discussion panel to appear under the editor. NOTE: Checking or unchecking this option only applies to your user even if your user has administrative permissions on the site. It does not apply to other users.
5. Within the “Discussion” panel, you’ll find checkboxes labeled “Allow comments” and “Allow trackbacks and pingbacks on this page.” Check or uncheck the former box to enable or disable comments, respectively.
6. Update or publish the page by clicking the “Update” or “Publish” button on the right side of the editor.
Disable Comments Sitewide in WordPress Using a Plugin
A popular and actively maintained plugin for managing commenting features on a WordPress site is Disable Comments.
This plugin will allow you to enable or disable comments globally, or just for one or more post types in WordPress (e.g., Pages, Posts, Media, etc.).
The plugin also allows disabling the ability to make comments via XML-RPC and REST-API.
Disable Comments. can also assist with the permanent deletion of comments for your entire website or specific posts types (e.g., Pages, Posts, Media, etc.).
NOTE: Be sure to perform a database backup prior to attempting the deletion of comment data.
Have a Question or a Better Solution?
Feel free to drop a note in the comments below. Good commenting!


